Oracle Blockchain Cloud Service — Invoke Chaincode from a Visual Builder Cloud Service application, Part 1 — Connecting VBCS to Oracle Blockchain

The Blockchain Development Series
The previous blog posts introduced the OBCS — Oracle Blockchain Cloud Service as well as providing the steps on how to configure the Network Founder Instance and a Participant Organization instance.
We also explored how to perform the required Fabric network configurations, including the ones required for peers, channels, security, and other components.
In complement, we also demonstrated how to perform the chaincode (smart contract) deployment and instantiation as well as the steps required to invoke the chaincode (smart contract) business methods by using the OBCS REST APIs.
The previous blog posts introduced the OBCS — Oracle Blockchain Cloud Service as well as providing the steps on how to configure the Network Founder Instance and a Participant Organization instance.
We also explored how to perform the required Fabric network configurations, including the ones required for peers, channels, security, and other components.
In complement, we also demonstrated how to perform the chaincode (smart contract) deployment and instantiation.
Now, this blog post provides the steps required to invoke the chaincode (smart contract) business methods from a Visual Builder Cloud Service application.
Intro to Visual Builder Cloud Service (VBCS)— Agile Apps for the Enterprise (low-code development platform / RAD tool)
In case you’ve never heard about VBCS, it’s a low-code development platform that’s provided by Oracle as an Oracle Cloud service.
Low-code development platforms can be summarized below:
“A low-code development platform is software that provides an environment programmers use to create application software through graphical user interfaces and configuration instead of traditional computer programming.”
So, you can create an application with no coding tasks at all. However, in case that’s required it is still flexible so you can also edit the generated code and customize it at your will, depending on your requirements.
For example, you can provide a different Javascript library to be used by your application, a specific CSS style sheet with your company’s visual identity, and look-and-feel standards.
Create the VBCS Instance
Access the VBCS Service Console. Then click the Create Instance button as shown below:

Provide the instance information as shown below and click the Next button.

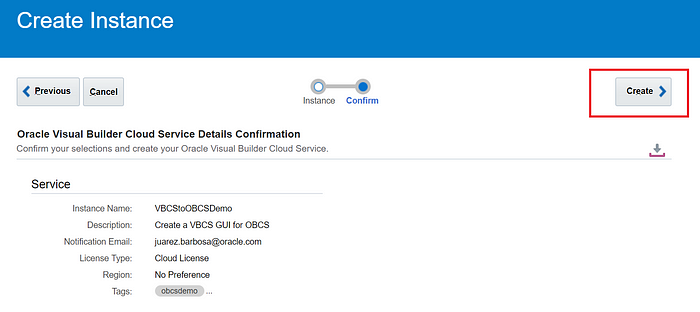
Confirm the instance information and click the Create button.

After a few minutes the instance will be created and available as shown below:

Create the VBCS Application
Now it’s time to create the VBCS application. Click the New Application button as shown below:

Provide the application details as shown below and click the Finish button.

The application will be created and it will be available as shown below:

Create a Service Connection
The next step is to create the Service Connection that will allow us to call the OBCS REST API.
You will see a screen below, go to select the Service Connections option among other options. Click the Service Connection option as shown below:

Click the button +Service Connection as shown below:

Select Define by Endpoint as the source as shown below:

We need to configure a couple of URLs, one for the /invocation method and the other one for the /query method.
First, let’s configure the /invocation that’s required to include a car. Provide the URL below, select POST as the HTTP method and the Action Hint as Create as shown below:
/invocation URL (replace with your IP and port): https://7B6551B4717C4825AC61471B09559DA9.blockchain.ocp.oraclecloud.com:443/restproxy1/bcsgw/rest/v1/transaction/invocation

The screen below is shown the basic connection information. Select the authentication tab:

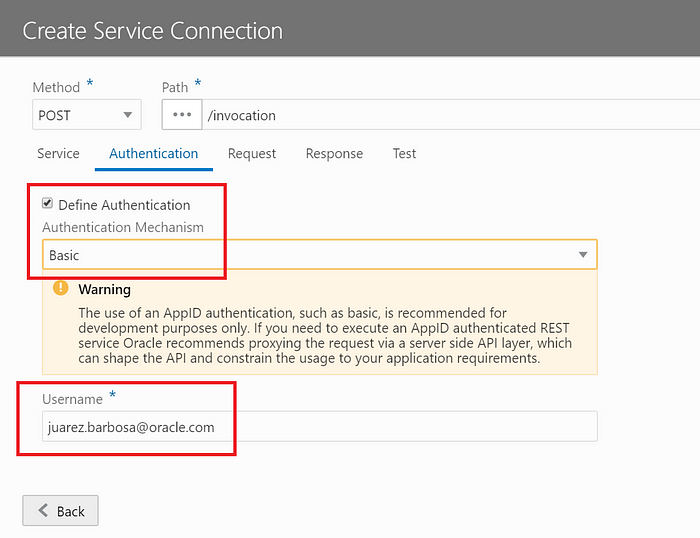
Inform the authentication details. For the purposes of this tutorial, we’ll use HTTP Basic as the authentication method, however other authentication methods are also supported including Token-based authentication with OAuth2, which will be the subject of a future post.
Provide the authentication information as below:

Inform the password:

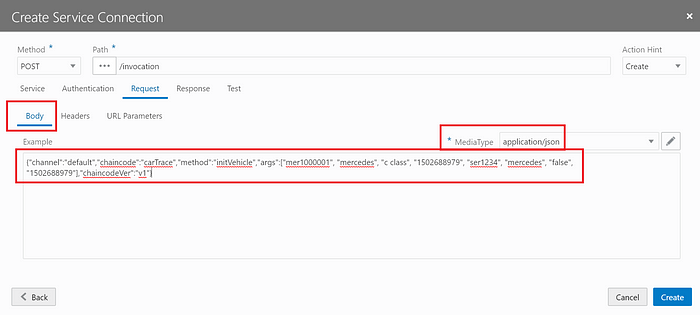
Select the Request tab and enter the Body details as shown below:

Select the Response tab and enter the Body details as shown below:

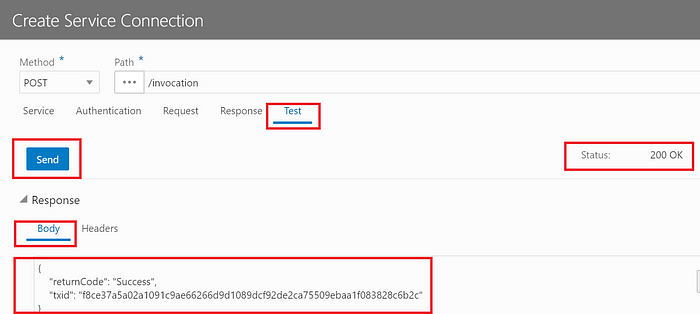
Select the Test tab, and click the Send button. Provided that everything is OK you will see an HTTP response code 200 OK and the response body as shown below:

Repeat the steps below for the /query call so that you will have two Service Connections as shown below:
/query URL (replace with your IP and port): https://7B6551B4717C4825AC61471B09559DA9.blockchain.ocp.oraclecloud.com:443/restproxy1/bcsgw/rest/v1/transaction/query

Wrapping up
That’s it, now we have the working connections to our Blockchain network as required.
The next blog post will illustrate how to create a compelling Graphical User Interface (GUI) that will allow the business user to interact with the Blockchain, send Blockchain transactions and read data back from the Blockchain structure.
Would you like to explore the power of visual application development with VBCS and the combination of that with Blockchain? Give it a try!
Oracle Developers and Oracle OCI Free Tier
Join our Oracle Developers channel on Slack to discuss Microservices, Java, JDBC, Oracle Cloud Infrastructure, Oracle Database, and other topics!
Build, test, and deploy your applications on Oracle Cloud — for free! Get access to OCI Cloud Free Tier!

